Background

Monday, February 18, 2013

Making My House A Home: Wall Clock

So it's been 7 weeks (ish) since I made my resolution to blog at least once a week and I have officially failed.  As much as I'm not a fan of failure it does feel good to not have that pressure anymore :-)  I would check my blog in a panic trying to remember when I last blogged.  It's not for a lack of ideas, I've got a ton of posts started, but then I forget to take the pictures I need and then...yeah.  So I'm moving forward!

Want to know a secret?  I'm not very good at decorating.  Well I guess I should be a little more specific.  I'm not very good at decorating walls.  Yes, it's sad, but true.  If you come to my house the walls are sadly lacking in anything.  In fact, besides a State Seal signed by all the State Representatives and the artwork on the walls in the nursery we don't have anything on our walls.  It's shameful, especially since we've lived in our house for 3 years now.  Oi.

I can't really explain why, I guess I'm just intimidated by all the blank space. It's kind of weird because I don't have that problem with shelves or centerpieces.  I see an empty shelf or flat (horizontal) space and I have almost no problem envisioning what I want there.  For example these are the built in shelves in our 2nd floor bathroom:


There are a couple more things on them now than when this picture was taken, but it looks just like I pictured in my mind.  It took some scouting at antique stores, but I got the pieces and I love the clean look.

This, on the other hand, makes me shake in my boots:
Too. Much. Empty. Space.
Part of the problem is the fact that several of the rooms where I want to put things on the wall  need to be painted, and for some reason I feel like they should be painted before I put stuff up.  I'm not sure there's any real logic there, just a feeling I have.  Plus to put things on the wall you have to have things to put on the wall.  That takes money which, to quote my mom, doesn't grow on trees around these parts.  So my walls remain bare.

However, since the advent of Pinterest I'm beginning to realize that it doesn't have to take a lot of money to make your house a home, but doing so takes more than just art on the walls.  It's the little things.  So that's what I'm hoping to accomplish in the coming year.  The little things around the house that make it a tad more cozy, a tad more inviting, and make my husband excited to come home after work each day.

That being said I'm going to be starting a series called "Making My House A Home" where I blog about cozy-fying (spell-check doesn't like the word I made up) my house and turning it into a home.  Doing it on the cheap will also be a key feature since, you know, we have that whole money not growing on trees thing going on.

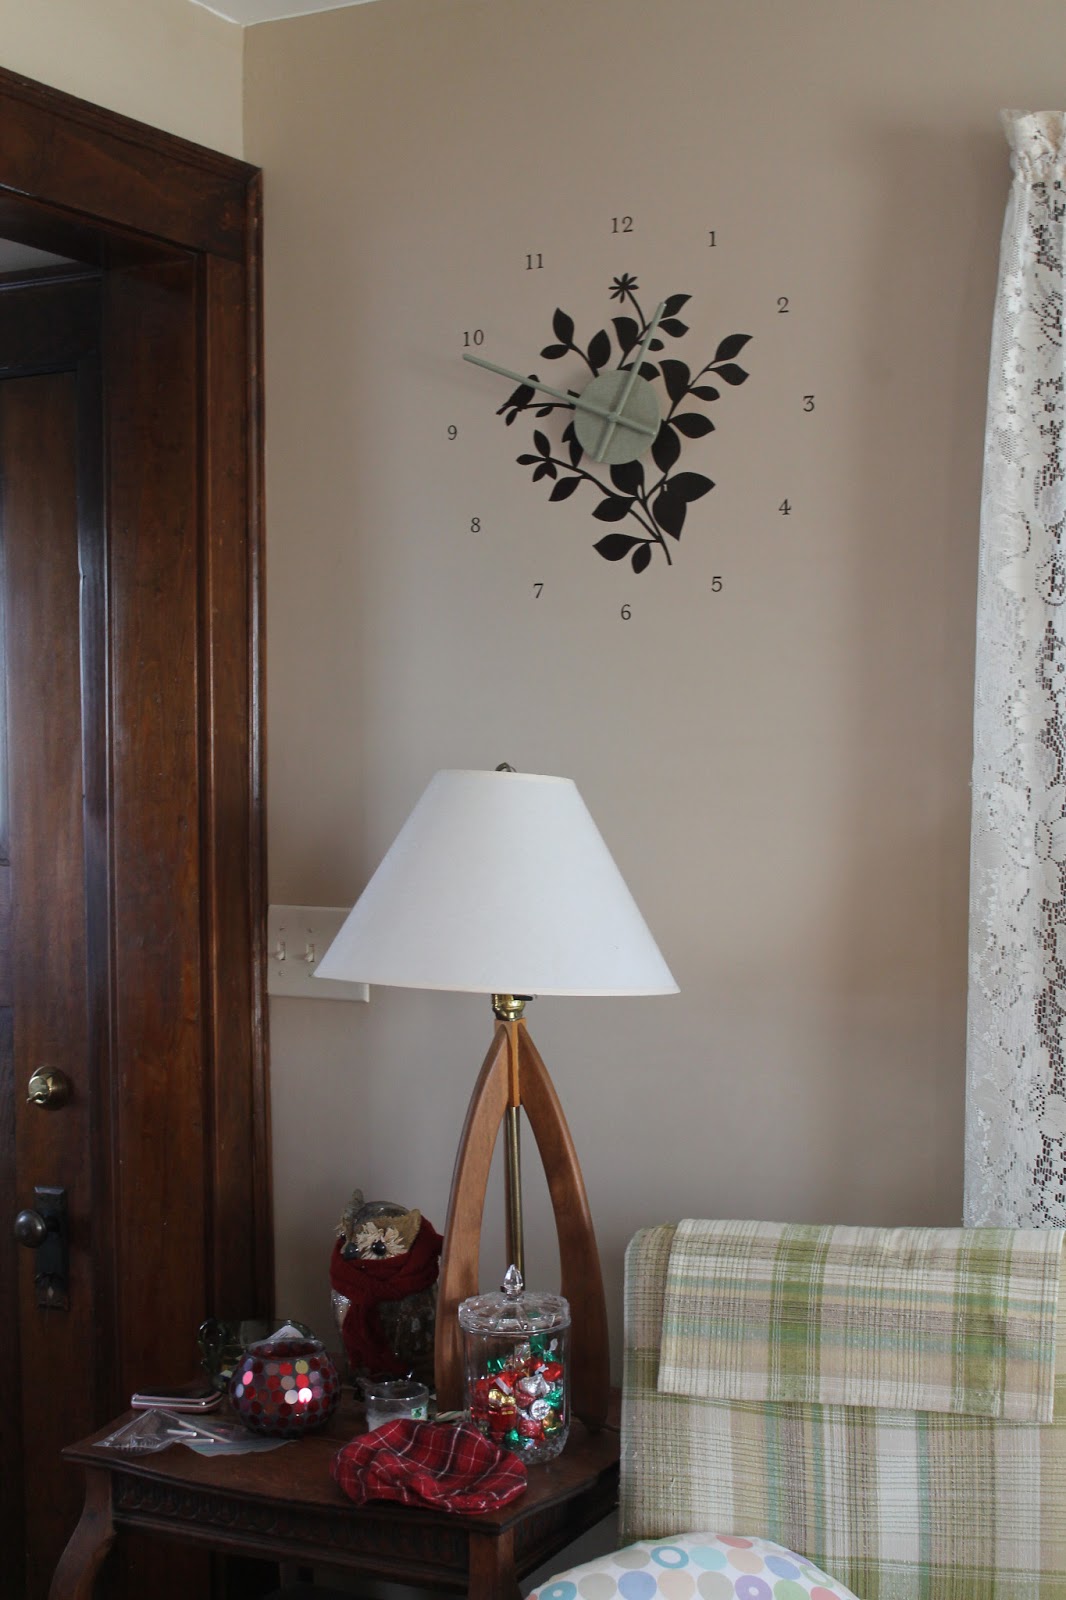
So my first post in this series is about the wall decal clock that we recently put up.  This was a huge decision for me because it means that we aren't planning to paint our living room anytime in the near future.  For whatever reason this particular type of decal can't be removed and reapplied.  Once it's up, it's up :-)  I picked up this clock decal kit at Target three years ago for about $5 on clearance.  It was a great find and I was excited to put it up.  But once I got home I became indecisive and my palms got sweaty and I put it down in the basement. 

Fast forward three years and I rediscovered the clock while I was cleaning the basement and Will and I decided to put it up.  Will did most all of the work, and believe me, it was work.  But I think it turned out great and I love hearing Liam exclaim, "Clock!" every time he comes downstairs!


The kit came with about 12 extra little birds that you could add to the wall around the clock.  That's a lot of birds.  So far I haven't done anything with them because I'm liking the simplicity of the clock with just the one bird but we'll see, I might get adventurous and add some more!

Cost: $5 (Target)
Time Involved: 45 minutes of Will's life

Friday, February 8, 2013

"Tangled"/Rapunzel Cake Pop Tutorial

I just wanted to give you a warning ahead of time that this post is long.  No one has ever complained that I'm too concise so don't say I didn't warn you!  Also, make sure you read all the way through this tutorial before you actually start making the cake pops, it'll save you a lot of hassle and frustration later!

Almost two years ago (wow, I can't believe it was that long ago!)  I was asked to make some cake pops for a sweet little lady from my church.  She was having a "Tangled" themed birthday party.  I was excited but a little unsure as to which direction I should go with the pops.  I could do  Rapunzel's head, or her little chameleon friend, Pascal, or her hair.  I did a search on Google, but that really was no help, there wasn't really anything out there.  I finally decided I would try little towers because I was really taken by cute design of the tower Rapunzel lives in in the movie.

The result was this design:


I was very excited during the summer of 2011 to be featured as a "Pop Star" on Bakerella's website and since then I've been getting tons of requests for a tutorial on these pops.  I've even seen almost exact replica's of my design in Etsy Shops.

Last Christmas I had a request from one of Will's sweet nieces for some Rapunzel cake pops as she had seen the ones I made.  I was excited to try my hand at them again and decided this time I would take pictures and write up a tutorial.  So without further ado...

"Tangled"/Rapunzel Cake Pop Tutorial

!!WARNING!!  Please be prepared for long and intense instructions!

Things You Need:
  • Cake Pop Dough (1 cake mix will make between 36 and 48 of these pops, depending on size)
  • 2 Bags of Dark Chocolate Candy Melts
  • 1 Bag of Green Vanilla Candy Melts
  • 1 Bag of Yellow Vanilla Candy Melts
  • Lollipop Sticks (I prefer the longer ones for these pops)
  • Mini Flower Candy/Sprinkles
  • Mini Butterfly Candy/Sprinkles (optional)
  • Black Edible Ink Marker
  • Small Angled Paint Brush
  • Tweezers for Placing the Flowers
  • Large, Shallow Bowl and Spoon for Melting the Candy
  • 2 Decorating Bags, Squeeze Bottles, or Ziploc Bags
  • Stand for Drying and Holding Cake Pops (styrofoam blocks work great!)
Alright, lets get started!

If you don't already know how to make cake balls I would suggest you head on over to Bakerella's website for an in-depth tutorial on how to make them.   My tutorial will start with the cake pop dough being made and ready for rolling!

Once your cake pop dough has been mixed and refrigerated for 30 minutes take a chunk about an inch in diameter and roll it into a cylindrical shape.  I generally try to make each end of the cylinder flange out a little bit so it looks more like a tree trunk.  In this tutorial I didn't to save time.  Either way works. 
Next take a chunk of dough about 1/2 inch in diameter and form small cones, these will serve as the roof of the tower.  Many people have asked me if you can use a Hershey's Kiss as the roof to make things easier.  The answer is yes and no.  Yes, you can, you will need to adjust your cylinder size accordingly.  Obviously the kisses would not need to be dipped.  However, in my personal opinion using a Kiss means that your towers must be a bit thinner and then they tend to be a little less sturdy when dipping, so I make my own roof cones.
My towers and roofs waiting to be put on sticks for dipping!


As you can see a Hershey's Kiss isn't large enough for the size I like to make the towers, and I prefer that my "roofs" hang over the edge of the towers.
 Melt two bags of dark chocolate candy melts in a microwave safe bowl in the microwave for 30 seconds at a time until they are completely melted.  Stir the candy melts in between each 30 second session of microwaving.  I prefer a more shallow bowl where I can use a spoon to cover the pops with candy melts instead of dunking them in a deeper bowl.  These pops tend to get a little heavy and may pull off the stick if you dunk them
Next take a lollipop stick and dip the end of the stick into the melted chocolate candy melts and  insert the stick into one end of the cylinder, inserting up about half the length of the cylinder. 
Insert dipped sticks into the base of the cones as well. 


Ready for some quality fridge time!
Let these firm up in the fridge for 30 minutes, or 20 minutes in the freezer if you're in a time crunch.  The freezer/fridge step is crucial as you need the cylinders to be as firm as possible when dipping them, otherwise they will break in half and/or pull off the stick.
It's important that you dip the roof cones first so that when you dip the towers later you can simply attach the roofs to the tops of the wet towers.  Dip the roof cones into the brown melted candy making sure that the cone is completely covered. You'll need to tap the stick on the side of your dish or gently tap the wrist that is holding the roof cone in order to remove the excess candy coating.  
Don't forget to tap off the excess coating, otherwise you'll have a lopsided roof!
 Allow the cones to harden...
Brrr, it's cold in the fridge!
...and then remove them from the sticks.  


If you have one that ends up looking like this when you take the stick out:


It's fine, don't worry!  Once you put the roof cones on top of the towers this mess will disappear! 
Once you've removed all the roof cones from the sticks start dipping the cylinders.  Dip the cylinders in the brown candy coating  by laying the cylinder in the candy and using a spoon to completely cover it with the chocolate.  Don't forget to gently tap off the extra candy coating.  

Remember: Try not to dunk or swirl your towers in the candy coating as they are heavy for a cake pop and may fall off the stick or break apart!
While the candy coating on the tower is still wet gently set the roof cone on top of the cylinder. You may have to hold the roof cone tightly against the tower to ensure a good seal and a close fit. The melted candy coating from the cylinder will act as glue and the roof will be stuck tight to the cylinder.  
Now they're really starting to take shape!
Sometimes you get a little clumsy and this happens:
Whoops!  Gracefulness will never be my claim to fame...
Again, don't panic because your mistake will mostly be covered during the next step!
Next take a clean, small angled paint brush and, using the remainder of your melted chocolate candy coating begin to "paint" the roof of the tower so that if looks more like a stick/grass/mud thatched roof.  If you opted to use a Kiss instead of cake pop dough for the roof make sure you still do this step for an authentic look!

If you'd like, while you are "painting" the roof use the candy coating to attach small candy butterflies for added effect.  This is a little added touch of whimsy that makes me smile!

Once you are done "painting" the roofs take your black edible marker (available at most craft stores and online) and draw a window on the tower.  
My black marker conked out on me 1/4 of the way through my towers so I dipped my marker in black candy coloring (not to be confused with food coloring or icing color) and that seemed to work just fine!  Also, please excuse the horrendous looking one in the middle right, it fell apart on me earlier :-)
 Next, fill a decorating bag or squeeze bottle (or Ziploc bag with a corner cut off like I usually do) with green candy melts and melt them in the microwave in 30 second intervals until they are fully melted.  Use the melted green candy to draw squiggles all along the bottom of the tower to make  grass.  I generally like a few tall strands of grass to make things interesting.

I usually do this while holding my cake pop upright, but it's really hard to take a picture of myself doing that when I only have two hands and a one year old sitting on the floor next to me simultaneously sucking his thumb and trying to grab the camera strap :-)
While the grass is still wet attach mini candy flowers (stars work too) at various intervals on the grass.  You shouldn't have any problems getting all the way around the tower with flowers before the grass dries.  Having tweezers for placing the pieces of candy really helps!  These flowers are available in most cake decorating sections of supermarkets as well as craft stores.
It doesn't really matter if your grass is super neat or kind of messy because, well, it's just grass.  If someone complains you can just say that Rapunzel's landscaping guy was kidnapped by Mother Gothel, or something :-)
Finally, fill a squeeze bottle or decorating bag (or Ziploc bag) with yellow candy melts and melt them in the microwave using the same method as above.  Take the bag and, starting at the window on the tower, squeeze out a long line of yellow "hair" that goes from the window down to the bottom of the tower in a rambling manner and then wraps around the top of the stick by the tower base.
Sorry this picture is a little fuzzy, I'm still getting used to the manual settings on my camera!


 If you follow these steps, before you know it you'll have a whole army of Rapunzel Towers!


And there you have it folks, my first serious (long) tutorial.  If any of my steps don't seem clear or you have an questions please don't hesitate to ask!

Sunday, February 3, 2013

Hoarding: The Early Years

I am not an organized person by nature.  Ask my mom, I'm sure she would be delighted to regale you with tales of my infamously messy bedroom growing up.  However now that I'm a lot older and a little wiser I'm seeing the value of an organized household.  I'm even enjoying making our lives more organized which, if you knew me growing up, is almost unbelievable. In my quest to make our house more organized it sometimes becomes crazy messy...

That being said, my husband deserves a prize.  Seriously. A couple weeks ago our  living and dining rooms looked like they were in the early stages of qualifying for a Hoarders episode on TLC and he was really sweet about it!


This pictures above represent my first attempt at using space saver bags, you know, the ones where you attach the vacuum hose and suck all the air out.  Since we have a storage space shortage in our house I was trying to condense some of Liam's things that he no longer uses and these bags did the trick and they couldn't have been easier to use! 

Thankfully this mess only lasted *ahem* a couple days.  Part of the problem was that my "helper" kept moving 0-3 month clothes into the 6-9 month pile, etc, so when I went to get ready to put clothes in a bag and suction out the air I would realize it was no longer the "only 0-3 months" pile.  Such is life with a busy body one year old but I wouldn't have it any other way.

So when it was all said and done my messy piles turned into this neat little pile:


And that makes me VERY happy!  The only problem...the "large" sized bags don't fit in the 18 gallon totes I use for storage in our basement.  Fortunately I have a larger tote that I took with me when I moved out of my parents house that they should fit in.  However that means I have to find homes in the basement for all the stuff it currently holds :-)

Tuesday, January 29, 2013

That's The Way The Cookie, er Cake, Crumbles

It's been awhile since I've posted about my kitchen mishaps.  Thankfully there haven't been that many to speak of, but a couple weeks ago I had a good one!  Two weekends ago we had Liam's 2nd 1st birthday party.  Did you follow that?  Liam had another 1st birthday party; this time we celebrated with Will's side of the family .  He was able to share the party with his sweet cousin who turned 6 years old.  Since his cousin had a Rapunzel themed cake and since there was around 14 of us (I think) we decided another cake was needed.

My sister-in-law had some cute animals with letters of the alphabet on them that came with the present she got Liam so she pulled out the L, I, A, and M for me to use if I wanted.  I decided to make a small, square, two layer cake with "grass" and a cute little graham cracker crumb path for the animals.  And of course sprinkles, lots and lots of sprinkles.

Recently on Pinterest I found a method of getting cakes to bake evenly and with a flat top.  The tutorial I used can be found here.  This was a major game changer for me and made me much more interested in making layer cakes.  It  really couldn't be easier either!  You just cut a strip off an old kitchen towel as wide as your baking pan is tall, get it wet with cold water, wring it out so that it's still fairly wet, but not dripping, drape it around your pan and secure it with a safety pin:


When I started this cake project I was super excited to use this method again.  I was so excited, in fact, that I forgot to grease my pan.  I remembered about half way through the baking time and knew it wasn't going to be pretty.   I was right:


Sigh...  I felt a little better in that I had used a cake mix leftover from cake pops that I hadn't used.  If I would have made this from scratch I probably would have been pretty upset with myself.  It also helped that I had another mix in the basement.  Originally I was only going to do 2 layers but I decided I would do 3 since I ended up having one intact layer from the first cake mix and would have 2 from the second mix. 

I set about making the second layer from the first mix and made sure I greased the pan.  I was quite pleased with the results:


I grabbed the second cake mix and got to work.  Since I only have one pan for baking layer cakes I tend to get a little impatient at times.  This would be one of those times.  Apparently I didn't let the cake cool long enough because as I turned the pan upside down onto a cooling rack to await placement on the unfrosted first layer it fell apart:


Sigh again....  At this point I was seriously considering throwing in the towel, going to Meijer, and buying a cake.  But, I still had that last layer to bake so I decided to give it a go.  I greased the pan, channeling Paula Deen in the process, and baked the cake.  I gave it ample opportunity to cool.  While I was patiently waiting I whipped up a batch of Cream Cheese Buttercream Frosting.  You can find the recipe here.  With the exception of my friend Leanna's similar buttercream recipe (she couldn't remember the exact measurements so I found a similar one online) this is one of the easiest, and most tasty frostings I've tried. 

Once I was sure the cake was cooled and I had frosted the first layer I popped the second layer out the pan and slapped that puppy on top.  Not really...  I oh-so-gently placed the second layer on top of the first layer and proceeded to do a crumb coat on the cake.  If you ever wanted to know how to properly frost a layer cake I found this amazing tutorial that is very detailed, but very easy to follow!

So here's my little cake with the crumb coat:


I am happy to report that no crumbs made it through to the final coat of frosting!!  I should say that I cannot be absolutely certain regarding the accuracy of that statement since the side of the cake is covered in sprinkles and the top has "grass" piped on...


And here's the cake with the animals on top:


And here's the adorable Rapunzel cake my talented sister-in-law made (she even made her own marshmallow fondant, which was quite tasty!):


And here's the aftermath:


And here's one of the Birthday Boy opening up his present from Grandmama and Grandpapa:
 
Needless to say, though the cake caused me several headaches it was worth it (and tasty too!).   Next up in my food related postings will be a tutorial on how to make the Tangled/Rapunzel Tower Cake Pops seen in the background of the picture above!


Saturday, January 26, 2013

Shocking Indeed!

So yesterday I was wearing this pretty scarf:


I recently took a liking to wearing scarves.  I'm know I'm a little late to the scarf-wearing party, but ya know, that's just how I am when it comes to fashion :-)  Better late than never right?   But I digress...

So I was wearing the scarf!  During the day I had been doing lots of laundry, some of which included the blankets Liam sleeps with at night.  There was a soft, cuddly afghan, and a cozy argyle fleece blanket.  I happened to wash and dry them with one the blankets from our bed which is a big warm microfleece blanket.  Needless to say when I pulled them out of the dryer there was a whole lot of static cling going on.  

I took the bundle of blankets up to Liam's room where I was going to pull them apart.  I put them on the rocker and started by pulling the afghan out of the pile.  When my arm brushed against my scarf I felt a little tingly electric shock.  I was a little surprised but kept pulling.  The more I pulled the more static noises I heard.  Suddenly I felt little shocks and tingles running around my neck.  It was like tiny little pricks of heat zapping every part of my neck at once.  I threw the blanket down and pulled off my scarf.  I immediately knew what the problem was.  You see there are little, shiny metallic threads running all through my scarf and they were conducting the electricity around my scarf and zapping me in the process!  It was the strangest feeling and one I hope not to repeat anytime in the near future!