I've been wanting to try some new makeup techniques lately so I was VERY excited when I discovered e.l.f Cosmetics at Meijer this week. Basically it is a very affordable line of all sorts of cosmetics from foundation to eye shadow. They even have makeup brushes. Everything (at least at Meijer) was $3 or under and most items were $2 and under. I was ecstatic because when I'm trying out new things that I may only use one or two times I don't want to have to shell out the big bucks!
So I picked up an eye shadow smudging brush, a four-pack of coordinating eye shadow, and some eye shadow primer for $4 total. Um yeah, I can handle that! So I got home, waited for my little man to go down for a nap and I got to work trying to imitate a "smoky" look I'd seen on Pinterest. And, I failed. Miserably. Instead of "smoky" I somehow ended up with "racoon". Oh well, practice makes perfect so they say!

Thursday, February 21, 2013
Tuesday, February 19, 2013
My Day In Pictures (and a few words too...)
Last week was quite a busy week and it was capped off with Will's parents coming to visit for the weekend. I am extremely thankful for Will's parents and the fact that they are so loveable; it's certainly nice when you get along with your in-laws! This morning, due to poor driving conditions my Bible Study was cancelled so Liam and I decided to have a semi-lazy day:
After Will's parents left yesterday I found one of my mother-in-law's bracelets on the floor in our spare bedroom so I sent her an email to let her know I had it. She emailed back saying that she had also lost her chapstick somewhere along the way. I really had no hope of finding it and was therefore quite surprised when I opened Liam's Peg & Hammer Bench and realized Liam had slipped it inside. When I finished taking the picture above I turned around and caught sight of this:
Keeping up with Liam has been a full-time job today, he's been on the go since the moment he woke up. Thankfully my little man is napping now and I'm able to take a wee little break!
 |
| "Hmmm, what's that?" |
 |
| "I almost got it!" |
 | |||
| "Grandmama, I found your chapstick!" |
 |
| My little mountain climber! |
 | ||||||
| As I started folding laundry he climbed into the basket.... |
 |
| ...and promptly tipped over trying to reach the lens cap! |
 |
| But he was not to be deterred from the task at hand! |
 |
| "Hmm what else can I climb on? Apparently not this!" |
 |
| And so he moved on to his rocking chair, but that didn't work either. |
 |
| "Nothing under there for me to get into" |
 |
| "Maybe there's something in here I can get!" |
 |
| "If I could just see in *grunts*" |
Monday, February 18, 2013
Making My House A Home: Wall Clock
So it's been 7 weeks (ish) since I made my resolution to blog at least once a week and I have officially failed. As much as I'm not a fan of failure it does feel good to not have that pressure anymore :-) I would check my blog in a panic trying to remember when I last blogged. It's not for a lack of ideas, I've got a ton of posts started, but then I forget to take the pictures I need and then...yeah. So I'm moving forward!
Want to know a secret? I'm not very good at decorating. Well I guess I should be a little more specific. I'm not very good at decorating walls. Yes, it's sad, but true. If you come to my house the walls are sadly lacking in anything. In fact, besides a State Seal signed by all the State Representatives and the artwork on the walls in the nursery we don't have anything on our walls. It's shameful, especially since we've lived in our house for 3 years now. Oi.
I can't really explain why, I guess I'm just intimidated by all the blank space. It's kind of weird because I don't have that problem with shelves or centerpieces. I see an empty shelf or flat (horizontal) space and I have almost no problem envisioning what I want there. For example these are the built in shelves in our 2nd floor bathroom:

There are a couple more things on them now than when this picture was taken, but it looks just like I pictured in my mind. It took some scouting at antique stores, but I got the pieces and I love the clean look.
This, on the other hand, makes me shake in my boots:
Part of the problem is the fact that several of the rooms where I want to put things on the wall need to be painted, and for some reason I feel like they should be painted before I put stuff up. I'm not sure there's any real logic there, just a feeling I have. Plus to put things on the wall you have to have things to put on the wall. That takes money which, to quote my mom, doesn't grow on trees around these parts. So my walls remain bare.
However, since the advent of Pinterest I'm beginning to realize that it doesn't have to take a lot of money to make your house a home, but doing so takes more than just art on the walls. It's the little things. So that's what I'm hoping to accomplish in the coming year. The little things around the house that make it a tad more cozy, a tad more inviting, and make my husband excited to come home after work each day.
That being said I'm going to be starting a series called "Making My House A Home" where I blog about cozy-fying (spell-check doesn't like the word I made up) my house and turning it into a home. Doing it on the cheap will also be a key feature since, you know, we have that whole money not growing on trees thing going on.
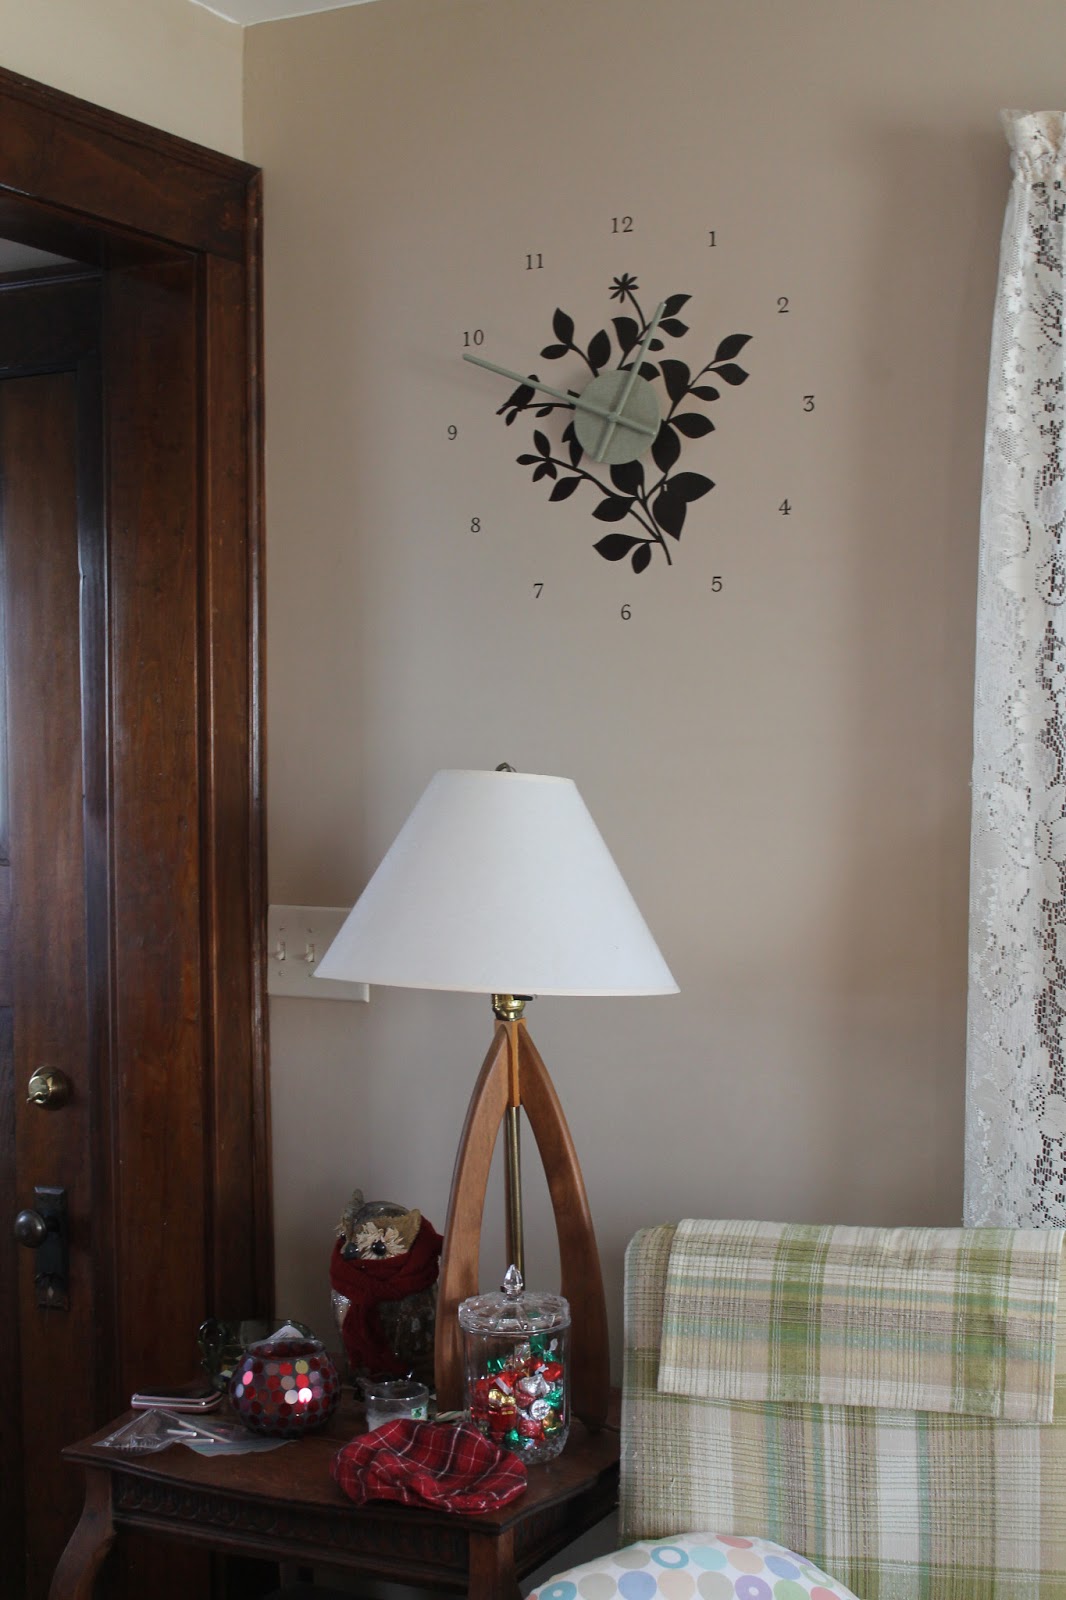
So my first post in this series is about the wall decal clock that we recently put up. This was a huge decision for me because it means that we aren't planning to paint our living room anytime in the near future. For whatever reason this particular type of decal can't be removed and reapplied. Once it's up, it's up :-) I picked up this clock decal kit at Target three years ago for about $5 on clearance. It was a great find and I was excited to put it up. But once I got home I became indecisive and my palms got sweaty and I put it down in the basement.
Fast forward three years and I rediscovered the clock while I was cleaning the basement and Will and I decided to put it up. Will didmost all of the work, and believe me, it was work. But I think it turned out great and I love hearing Liam exclaim, "Clock!" every time he comes downstairs!

The kit came with about 12 extra little birds that you could add to the wall around the clock. That's a lot of birds. So far I haven't done anything with them because I'm liking the simplicity of the clock with just the one bird but we'll see, I might get adventurous and add some more!
Cost: $5 (Target)
Time Involved: 45 minutes of Will's life
Want to know a secret? I'm not very good at decorating. Well I guess I should be a little more specific. I'm not very good at decorating walls. Yes, it's sad, but true. If you come to my house the walls are sadly lacking in anything. In fact, besides a State Seal signed by all the State Representatives and the artwork on the walls in the nursery we don't have anything on our walls. It's shameful, especially since we've lived in our house for 3 years now. Oi.
I can't really explain why, I guess I'm just intimidated by all the blank space. It's kind of weird because I don't have that problem with shelves or centerpieces. I see an empty shelf or flat (horizontal) space and I have almost no problem envisioning what I want there. For example these are the built in shelves in our 2nd floor bathroom:

There are a couple more things on them now than when this picture was taken, but it looks just like I pictured in my mind. It took some scouting at antique stores, but I got the pieces and I love the clean look.
This, on the other hand, makes me shake in my boots:
 |
| Too. Much. Empty. Space. |
However, since the advent of Pinterest I'm beginning to realize that it doesn't have to take a lot of money to make your house a home, but doing so takes more than just art on the walls. It's the little things. So that's what I'm hoping to accomplish in the coming year. The little things around the house that make it a tad more cozy, a tad more inviting, and make my husband excited to come home after work each day.
That being said I'm going to be starting a series called "Making My House A Home" where I blog about cozy-fying (spell-check doesn't like the word I made up) my house and turning it into a home. Doing it on the cheap will also be a key feature since, you know, we have that whole money not growing on trees thing going on.
So my first post in this series is about the wall decal clock that we recently put up. This was a huge decision for me because it means that we aren't planning to paint our living room anytime in the near future. For whatever reason this particular type of decal can't be removed and reapplied. Once it's up, it's up :-) I picked up this clock decal kit at Target three years ago for about $5 on clearance. It was a great find and I was excited to put it up. But once I got home I became indecisive and my palms got sweaty and I put it down in the basement.
Fast forward three years and I rediscovered the clock while I was cleaning the basement and Will and I decided to put it up. Will did
The kit came with about 12 extra little birds that you could add to the wall around the clock. That's a lot of birds. So far I haven't done anything with them because I'm liking the simplicity of the clock with just the one bird but we'll see, I might get adventurous and add some more!
Cost: $5 (Target)
Time Involved: 45 minutes of Will's life
Friday, February 8, 2013
"Tangled"/Rapunzel Cake Pop Tutorial
I just wanted to give you a warning ahead of time that this post is long. No one has ever complained that I'm too concise so don't say I didn't warn you! Also, make sure you read all the way through this tutorial before you actually start making the cake pops, it'll save you a lot of hassle and frustration later!
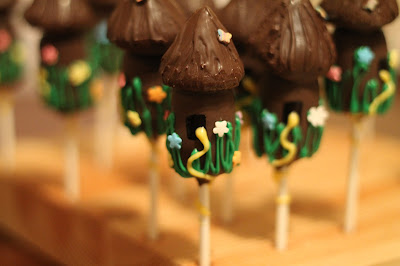
Almost two years ago (wow, I can't believe it was that long ago!) I was asked to make some cake pops for a sweet little lady from my church. She was having a "Tangled" themed birthday party. I was excited but a little unsure as to which direction I should go with the pops. I could do Rapunzel's head, or her little chameleon friend, Pascal, or her hair. I did a search on Google, but that really was no help, there wasn't really anything out there. I finally decided I would try little towers because I was really taken by cute design of the tower Rapunzel lives in in the movie.
The result was this design:

I was very excited during the summer of 2011 to be featured as a "Pop Star" on Bakerella's website and since then I've been getting tons of requests for a tutorial on these pops. I've even seen almost exact replica's of my design in Etsy Shops.
Last Christmas I had a request from one of Will's sweet nieces for some Rapunzel cake pops as she had seen the ones I made. I was excited to try my hand at them again and decided this time I would take pictures and write up a tutorial. So without further ado...
"Tangled"/Rapunzel Cake Pop Tutorial
!!WARNING!! Please be prepared for long and intense instructions!
Things You Need:
If you don't already know how to make cake balls I would suggest you head on over to Bakerella's website for an in-depth tutorial on how to make them. My tutorial will start with the cake pop dough being made and ready for rolling!
Once your cake pop dough has been mixed and refrigerated for 30 minutes take a chunk about an inch in diameter and roll it into a cylindrical shape. I generally try to make each end of the cylinder flange out a little bit so it looks more like a tree trunk. In this tutorial I didn't to save time. Either way works.
Let
these firm up in the fridge for 30 minutes, or 20 minutes in the freezer
if you're in a time crunch. The freezer/fridge step is crucial as you
need the cylinders to be as firm as possible when dipping them,
otherwise they will break in half and/or pull off the stick.
...and then
remove them from the sticks.

If you have one that ends up looking like this when you take the stick out:
Once you've removed all the roof cones from the sticks start dipping the cylinders. Dip the cylinders in the brown candy coating by laying the cylinder in the candy and using a spoon to completely cover it with the chocolate. Don't forget to gently tap
off the extra candy coating.

If you'd like, while you are "painting" the roof use the candy coating to attach small candy butterflies for added effect. This is a little added touch of whimsy that makes me smile!
Almost two years ago (wow, I can't believe it was that long ago!) I was asked to make some cake pops for a sweet little lady from my church. She was having a "Tangled" themed birthday party. I was excited but a little unsure as to which direction I should go with the pops. I could do Rapunzel's head, or her little chameleon friend, Pascal, or her hair. I did a search on Google, but that really was no help, there wasn't really anything out there. I finally decided I would try little towers because I was really taken by cute design of the tower Rapunzel lives in in the movie.
The result was this design:

I was very excited during the summer of 2011 to be featured as a "Pop Star" on Bakerella's website and since then I've been getting tons of requests for a tutorial on these pops. I've even seen almost exact replica's of my design in Etsy Shops.
Last Christmas I had a request from one of Will's sweet nieces for some Rapunzel cake pops as she had seen the ones I made. I was excited to try my hand at them again and decided this time I would take pictures and write up a tutorial. So without further ado...
"Tangled"/Rapunzel Cake Pop Tutorial
!!WARNING!! Please be prepared for long and intense instructions!
Things You Need:
- Cake Pop Dough (1 cake mix will make between 36 and 48 of these pops, depending on size)
- 2 Bags of Dark Chocolate Candy Melts
- 1 Bag of Green Vanilla Candy Melts
- 1 Bag of Yellow Vanilla Candy Melts
- Lollipop Sticks (I prefer the longer ones for these pops)
- Mini Flower Candy/Sprinkles
- Mini Butterfly Candy/Sprinkles (optional)
- Black Edible Ink Marker
- Small Angled Paint Brush
- Tweezers for Placing the Flowers
- Large, Shallow Bowl and Spoon for Melting the Candy
- 2 Decorating Bags, Squeeze Bottles, or Ziploc Bags
- Stand for Drying and Holding Cake Pops (styrofoam blocks work great!)
If you don't already know how to make cake balls I would suggest you head on over to Bakerella's website for an in-depth tutorial on how to make them. My tutorial will start with the cake pop dough being made and ready for rolling!
Once your cake pop dough has been mixed and refrigerated for 30 minutes take a chunk about an inch in diameter and roll it into a cylindrical shape. I generally try to make each end of the cylinder flange out a little bit so it looks more like a tree trunk. In this tutorial I didn't to save time. Either way works.
Next take a chunk of dough about 1/2 inch in diameter and form small cones, these will
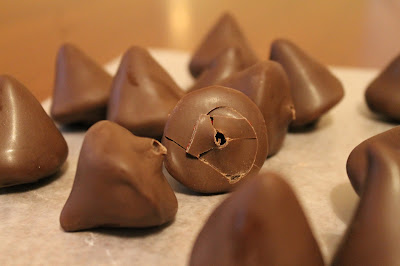
serve as the roof of the tower. Many people have asked me if you can use a Hershey's Kiss as the roof to make things easier. The answer is yes and no. Yes, you can, you will need to adjust your cylinder size accordingly. Obviously the kisses would not need to be dipped. However, in my personal opinion using a Kiss means that your towers must be a bit thinner and then they tend to be a little less sturdy when dipping, so I make my own roof cones.
 |
| My towers and roofs waiting to be put on sticks for dipping! |
 |
| As you can see a Hershey's Kiss isn't large enough for the size I like to make the towers, and I prefer that my "roofs" hang over the edge of the towers. |
Melt two bags of dark chocolate candy melts in a microwave safe bowl in the microwave for 30 seconds at a time until they are completely melted. Stir the candy melts in between each 30 second session of microwaving. I prefer a more shallow bowl where I can use a spoon to cover the pops with candy melts instead of dunking them in a deeper bowl. These pops tend to get a little heavy and may pull off the stick if you dunk them
Next take a lollipop stick and dip the end of the stick into the melted chocolate candy melts and insert the
stick into one end of the cylinder, inserting up about half the length
of the cylinder.
Insert dipped sticks into the base of the cones as well.  |
| Ready for some quality fridge time! |
It's important that you dip the roof cones first so that when you dip the towers later you can simply attach the roofs to the tops of the wet towers. Dip the roof cones into the brown melted candy making sure that the cone is completely covered.
You'll need to tap the stick on the side of your dish or gently tap the wrist that is holding the roof cone in order to
remove the excess candy coating.
 |
| Don't forget to tap off the excess coating, otherwise you'll have a lopsided roof! |
Allow the cones to harden...
 |
| Brrr, it's cold in the fridge! |

If you have one that ends up looking like this when you take the stick out:

It's fine, don't worry! Once you put the roof cones on top of the towers this mess will disappear!
 |
| Remember: Try not to dunk or swirl your towers in the candy coating as they are heavy for a cake pop and may fall off the stick or break apart! |
While the candy coating on the tower is still wet gently set the roof
cone on top of the cylinder. You may have to hold the roof cone tightly against the tower to ensure a good seal and a close fit. The melted candy coating from the cylinder
will act as glue and the roof will be stuck tight to the cylinder.
 |
| Now they're really starting to take shape! |
Sometimes you get a little clumsy and this happens:
 |
| Whoops! Gracefulness will never be my claim to fame... |
Again, don't panic because your mistake will mostly be covered during the next step!
Next take a clean, small angled paint brush and, using the remainder of your melted chocolate candy coating begin to
"paint" the roof of the tower so that if looks more like a
stick/grass/mud thatched roof. If you opted to use a Kiss instead of cake pop dough for the roof make sure you still do this step for an authentic look!

If you'd like, while you are "painting" the roof use the candy coating to attach small candy butterflies for added effect. This is a little added touch of whimsy that makes me smile!
Once you are done "painting" the roofs take your black edible marker (available at most craft stores and online) and draw a window on the tower.
 |
| My black marker conked out on me 1/4 of the way through my towers so I dipped my marker in black candy coloring (not to be confused with food coloring or icing color) and that seemed to work just fine! Also, please excuse the horrendous looking one in the middle right, it fell apart on me earlier :-) |
Next, fill a decorating bag or squeeze bottle (or Ziploc bag with a corner cut off like I usually do) with green candy melts and melt them in the microwave in 30 second intervals until they are fully melted. Use the melted
green candy to draw squiggles all along the bottom of the tower to make grass. I generally like a few tall strands of grass to make things interesting.
 |
| I usually do this while holding my cake pop upright, but it's really hard to take a picture of myself doing that when I only have two hands and a one year old sitting on the floor next to me simultaneously sucking his thumb and trying to grab the camera strap :-) |
While the grass is still wet attach
mini candy flowers (stars work too) at various intervals on the grass.
You shouldn't have any problems getting all the way around the tower with flowers before the grass dries. Having tweezers for placing the pieces of candy really helps! These flowers are available in most cake decorating sections of
supermarkets as well as craft stores.
 |
| It doesn't really matter if your grass is super neat or kind of messy because, well, it's just grass. If someone complains you can just say that Rapunzel's landscaping guy was kidnapped by Mother Gothel, or something :-) |
Finally,
fill a squeeze bottle or decorating bag (or Ziploc bag) with yellow candy melts
and melt them in the microwave using the same method as above. Take the bag and, starting at the window on the tower, squeeze out a long line of
yellow "hair" that goes from the window down to the bottom of the tower
in a rambling manner and then wraps around the top of the stick by the
tower base.
 | |||
| Sorry this picture is a little fuzzy, I'm still getting used to the manual settings on my camera! |
If you follow these steps, before you know it you'll have a whole army of Rapunzel Towers!

And there you have it folks, my first serious (long) tutorial. If any of my steps don't seem clear or you have an questions please don't hesitate to ask!
Sunday, February 3, 2013
Hoarding: The Early Years
That being said, my husband deserves a prize. Seriously. A couple weeks ago our living and dining rooms looked like they were in the early stages of qualifying for a Hoarders episode on TLC and he was really sweet about it!


This pictures above represent my first attempt at using space saver bags, you know, the ones where you attach the vacuum hose and suck all the air out. Since we have a storage space shortage in our house I was trying to condense some of Liam's things that he no longer uses and these bags did the trick and they couldn't have been easier to use!
Thankfully this mess only lasted *ahem* a couple days. Part of the problem was that my "helper" kept moving 0-3 month clothes into the 6-9 month pile, etc, so when I went to get ready to put clothes in a bag and suction out the air I would realize it was no longer the "only 0-3 months" pile. Such is life with a busy body one year old but I wouldn't have it any other way.
So when it was all said and done my messy piles turned into this neat little pile:

Subscribe to:
Posts (Atom)