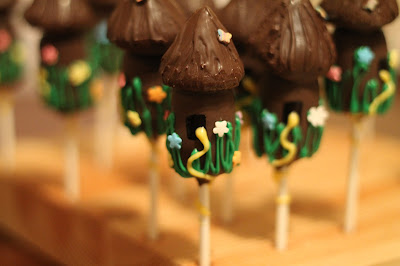
Almost two years ago (wow, I can't believe it was that long ago!) I was asked to make some cake pops for a sweet little lady from my church. She was having a "Tangled" themed birthday party. I was excited but a little unsure as to which direction I should go with the pops. I could do Rapunzel's head, or her little chameleon friend, Pascal, or her hair. I did a search on Google, but that really was no help, there wasn't really anything out there. I finally decided I would try little towers because I was really taken by cute design of the tower Rapunzel lives in in the movie.
The result was this design:
I was very excited during the summer of 2011 to be featured as a "Pop Star" on Bakerella's website and since then I've been getting tons of requests for a tutorial on these pops. I've even seen almost exact replica's of my design in Etsy Shops.
Last Christmas I had a request from one of Will's sweet nieces for some Rapunzel cake pops as she had seen the ones I made. I was excited to try my hand at them again and decided this time I would take pictures and write up a tutorial. So without further ado...
"Tangled"/Rapunzel Cake Pop Tutorial
!!WARNING!! Please be prepared for long and intense instructions!
Things You Need:
- Cake Pop Dough (1 cake mix will make between 36 and 48 of these pops, depending on size)
- 2 Bags of Dark Chocolate Candy Melts
- 1 Bag of Green Vanilla Candy Melts
- 1 Bag of Yellow Vanilla Candy Melts
- Lollipop Sticks (I prefer the longer ones for these pops)
- Mini Flower Candy/Sprinkles
- Mini Butterfly Candy/Sprinkles (optional)
- Black Edible Ink Marker
- Small Angled Paint Brush
- Tweezers for Placing the Flowers
- Large, Shallow Bowl and Spoon for Melting the Candy
- 2 Decorating Bags, Squeeze Bottles, or Ziploc Bags
- Stand for Drying and Holding Cake Pops (styrofoam blocks work great!)
If you don't already know how to make cake balls I would suggest you head on over to Bakerella's website for an in-depth tutorial on how to make them. My tutorial will start with the cake pop dough being made and ready for rolling!
Once your cake pop dough has been mixed and refrigerated for 30 minutes take a chunk about an inch in diameter and roll it into a cylindrical shape. I generally try to make each end of the cylinder flange out a little bit so it looks more like a tree trunk. In this tutorial I didn't to save time. Either way works.
Next take a chunk of dough about 1/2 inch in diameter and form small cones, these will
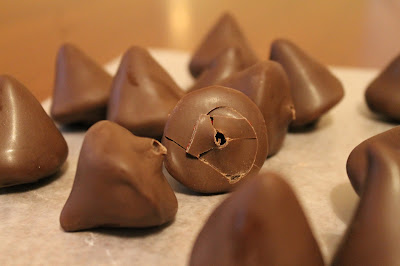
serve as the roof of the tower. Many people have asked me if you can use a Hershey's Kiss as the roof to make things easier. The answer is yes and no. Yes, you can, you will need to adjust your cylinder size accordingly. Obviously the kisses would not need to be dipped. However, in my personal opinion using a Kiss means that your towers must be a bit thinner and then they tend to be a little less sturdy when dipping, so I make my own roof cones.
 |
| My towers and roofs waiting to be put on sticks for dipping! |
 |
| As you can see a Hershey's Kiss isn't large enough for the size I like to make the towers, and I prefer that my "roofs" hang over the edge of the towers. |
Melt two bags of dark chocolate candy melts in a microwave safe bowl in the microwave for 30 seconds at a time until they are completely melted. Stir the candy melts in between each 30 second session of microwaving. I prefer a more shallow bowl where I can use a spoon to cover the pops with candy melts instead of dunking them in a deeper bowl. These pops tend to get a little heavy and may pull off the stick if you dunk them
Next take a lollipop stick and dip the end of the stick into the melted chocolate candy melts and insert the
stick into one end of the cylinder, inserting up about half the length
of the cylinder.
Insert dipped sticks into the base of the cones as well.  |
| Ready for some quality fridge time! |
It's important that you dip the roof cones first so that when you dip the towers later you can simply attach the roofs to the tops of the wet towers. Dip the roof cones into the brown melted candy making sure that the cone is completely covered.
You'll need to tap the stick on the side of your dish or gently tap the wrist that is holding the roof cone in order to
remove the excess candy coating.
 |
| Don't forget to tap off the excess coating, otherwise you'll have a lopsided roof! |
Allow the cones to harden...
 |
| Brrr, it's cold in the fridge! |
If you have one that ends up looking like this when you take the stick out:
It's fine, don't worry! Once you put the roof cones on top of the towers this mess will disappear!
 |
| Remember: Try not to dunk or swirl your towers in the candy coating as they are heavy for a cake pop and may fall off the stick or break apart! |
While the candy coating on the tower is still wet gently set the roof
cone on top of the cylinder. You may have to hold the roof cone tightly against the tower to ensure a good seal and a close fit. The melted candy coating from the cylinder
will act as glue and the roof will be stuck tight to the cylinder.
 |
| Now they're really starting to take shape! |
Sometimes you get a little clumsy and this happens:
 |
| Whoops! Gracefulness will never be my claim to fame... |
Again, don't panic because your mistake will mostly be covered during the next step!
Next take a clean, small angled paint brush and, using the remainder of your melted chocolate candy coating begin to
"paint" the roof of the tower so that if looks more like a
stick/grass/mud thatched roof. If you opted to use a Kiss instead of cake pop dough for the roof make sure you still do this step for an authentic look!
If you'd like, while you are "painting" the roof use the candy coating to attach small candy butterflies for added effect. This is a little added touch of whimsy that makes me smile!
Once you are done "painting" the roofs take your black edible marker (available at most craft stores and online) and draw a window on the tower.
Next, fill a decorating bag or squeeze bottle (or Ziploc bag with a corner cut off like I usually do) with green candy melts and melt them in the microwave in 30 second intervals until they are fully melted. Use the melted
green candy to draw squiggles all along the bottom of the tower to make grass. I generally like a few tall strands of grass to make things interesting.
While the grass is still wet attach
mini candy flowers (stars work too) at various intervals on the grass.
You shouldn't have any problems getting all the way around the tower with flowers before the grass dries. Having tweezers for placing the pieces of candy really helps! These flowers are available in most cake decorating sections of
supermarkets as well as craft stores.
Finally,
fill a squeeze bottle or decorating bag (or Ziploc bag) with yellow candy melts
and melt them in the microwave using the same method as above. Take the bag and, starting at the window on the tower, squeeze out a long line of
yellow "hair" that goes from the window down to the bottom of the tower
in a rambling manner and then wraps around the top of the stick by the
tower base.
 | |||
| Sorry this picture is a little fuzzy, I'm still getting used to the manual settings on my camera! |
If you follow these steps, before you know it you'll have a whole army of Rapunzel Towers!
And there you have it folks, my first serious (long) tutorial. If any of my steps don't seem clear or you have an questions please don't hesitate to ask!


Wow, that's a great tutorial. I don't think I'd have the patience for it though (at least that's what I tell myself when I see stuff like this :P ).
ReplyDeleteYou know, I didn't think I would either when I started with Cake Pops, but for some reason I do with them. Now ask me how patient I am in learning how to knit or crochet...that's a totally different story ;-)
ReplyDelete